
Hello my friends,
I sent pictures to the Dollshouse Netherlands magazine on Belle's dressing room and powdering room, and they wanted to publish an article about it! Thrilling and exciting!!! I will show you the article in my next post (Finally!!!) on the 'finished' dressing room of Belle! What is more, they wanted to add a project for the daybed as well! Problem was that one can't buy the flat cabriole legs in the middle of my painted daybed.

The aim is to make the daybed project something that miniaturists with only basic carpentry skills need not shy away from. My suggestion was to make a second daybed that can be made with parts readily available in shops and online. Thus I made up thus second design. Not inspired on a Queen Anne model but on an earlier William & Mary model.
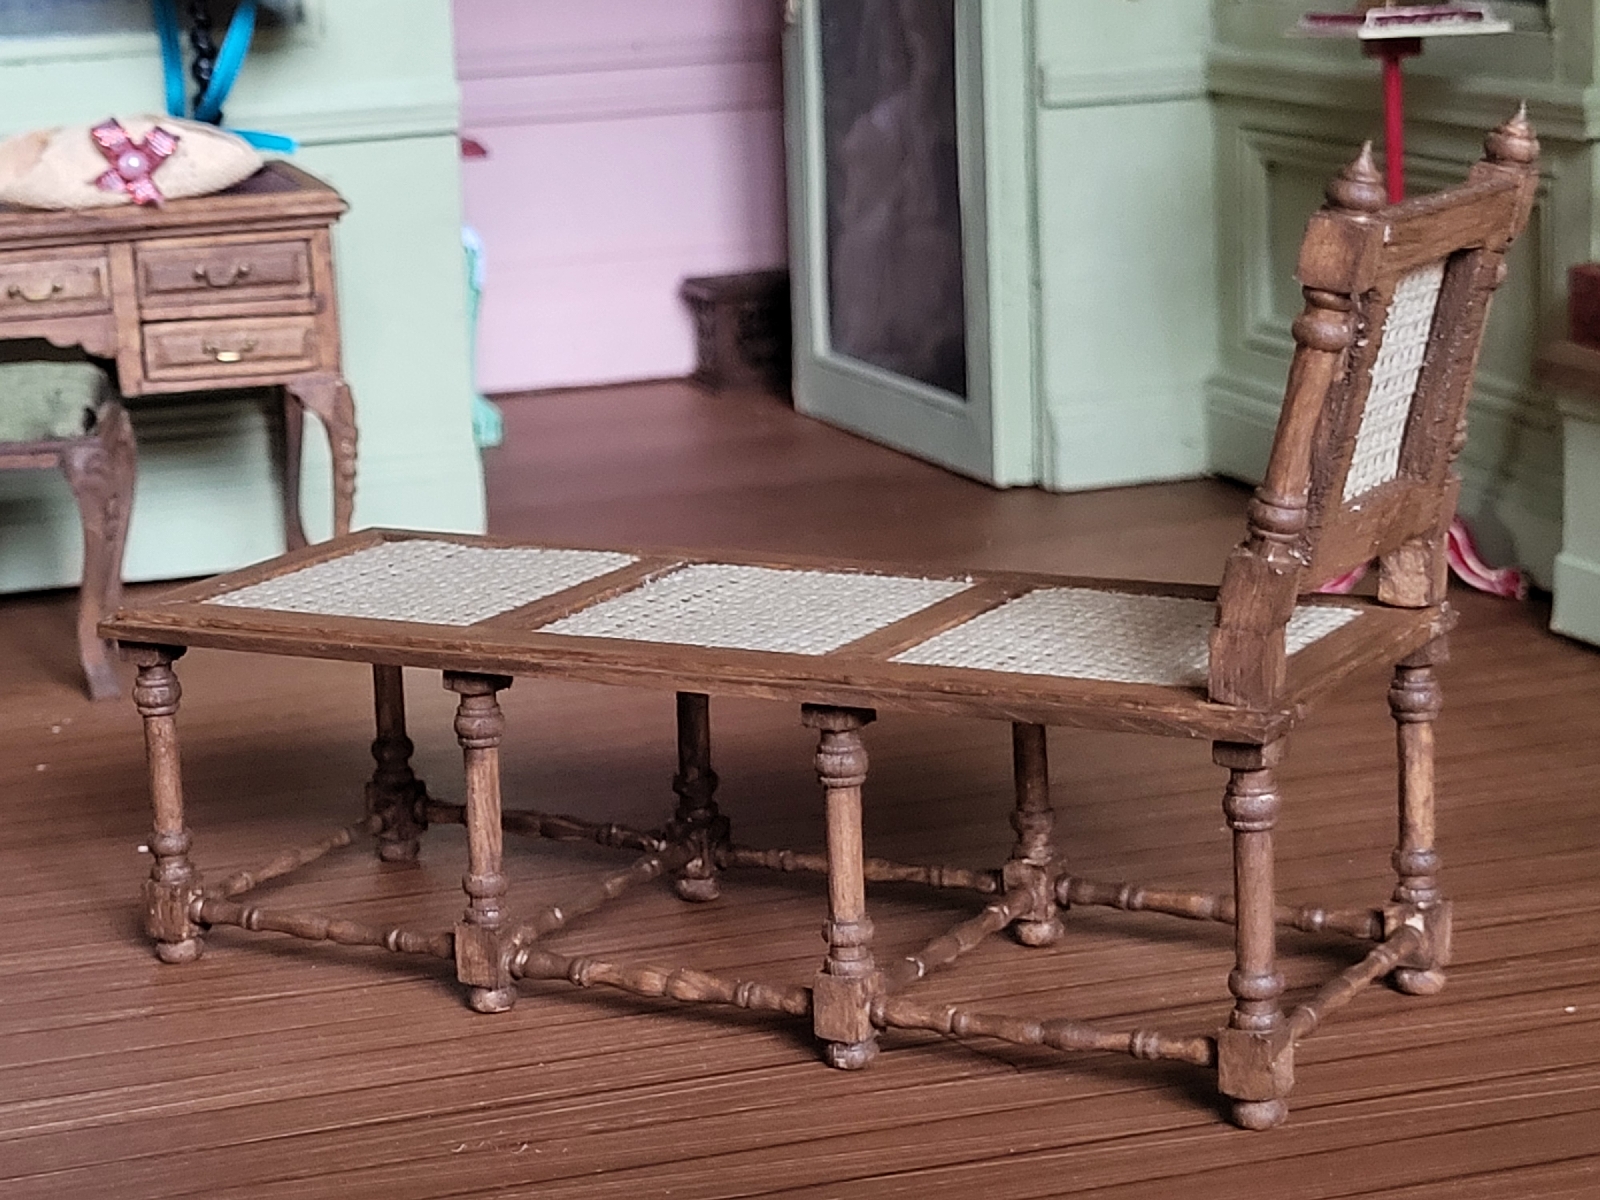
They liked the suggestion and I went to work. The older models are sometimes gilt but mostly they are stained wood. The seats are either covered with rushmatting, or caning, or upholstered with leather. The two pictures above were my inspiration. So this daybed was going to have turned wooden legs and stretchers while the seat and back are inset with caned panels.
For the legs I used turned (1:24?) Newel posts. For the stretchers I used the same turned spindles I used on the painted daybed. Embroidery canvas is used as the caned panels.
The top part can be finished in two different ways in that tutorial so that the readers who decide to make this daybed can choose there preferred finish. Upholstered in fabric like my painted daybed, or wood with the caned panels.

But first we have to make the structure for this daybed. This involves shortening the spindles by removing the outside ends. Now they are each 3.5 centimeter long.
I turned eight of the newel posts into legs by cutting of the top half of the decorative onion on the top (this will be the foot of the leg) and most of the square part at the bottom so that a 2 millimeter length of the square part remains.

Of the remaining two posts I filed off 3 degrees so they do not stand up straight but slant backwards like on the original examples. But these two won't be used until later.

First I glued each of four spindles between two legs. Making sure they are centered in the square part of the leg. Then I glued the remaining six spindles in between them to glue the four sets together to form the base of the daybed. With that done it was time to work on the superstructure.

The upholstered top is made in the same as in my post on the painted daybed. Therefore I will not include it here. But click on this link if you want to know what steps I took to make this #link#

I will show you how I made the wooden top for this daybed with the inset caned panels. First I cut out a template for the seat. The circomference of the legs and stretchers measures 12,5 x 4,5 centimeters exactly. The seat should overlap 1 millimeter on all sides. So the template should measure 12,7 x 4,7.

I use strips of 1x7 millimeter lindenwood to cut six pieces for the base of the seat. They are not mitered on the corners.
Then I cut and mitre strips of 1x5 millimeter and glue them on top. Once in place the first layer sticks out 1 millimeter on all sides. On the outer edge this is purely decorative. I round the top corner off with a file. These inner edges are where the pieces of stramien will be fixed with glue.

Before I glue the stramien in place I paint the whole piece brown. I mixed raw umber and burned umber in a ratio of one to two. Than I added an equal amount of acrylic medium to the mix to thin the mixtures pigments. This way the paint will be somewhat translucent. I did this because I want to give the wood a stained look. But stain won't stick to glue if visible.

When aplied thinly and brushed out well, the brown painted wood will look like it is stained. If you look closely you can still see some of the grain of the wood. And I deliberately did not aply the paint mixture evenly to get some subtle differences in the colour.
To finish it off I cut out four panels of embroidery canvas to simulate the caned seating.

And then we have a daybed in the style of William and Mary. I can add a matrass, bolster and pillows. But for now I will leave it as it is. It would only hide the top part with the 'caned' insets an I think that is a shame.
Now for a couple like the Zonneschuts an old fashioned daybed like this would only get pride of place if a royal person would have layed on it or something like that. As far as I know that is not the case. So this daybed will return in the Steward's office. For the Steward's convenience (he makes long days and sometimes even spents the night there if required) and to impress the tenant farmers and such. For this antique is maybe out of style but still impressive to those who only sit on bare wood or matted chairseats and sleep on straw matrasses.


